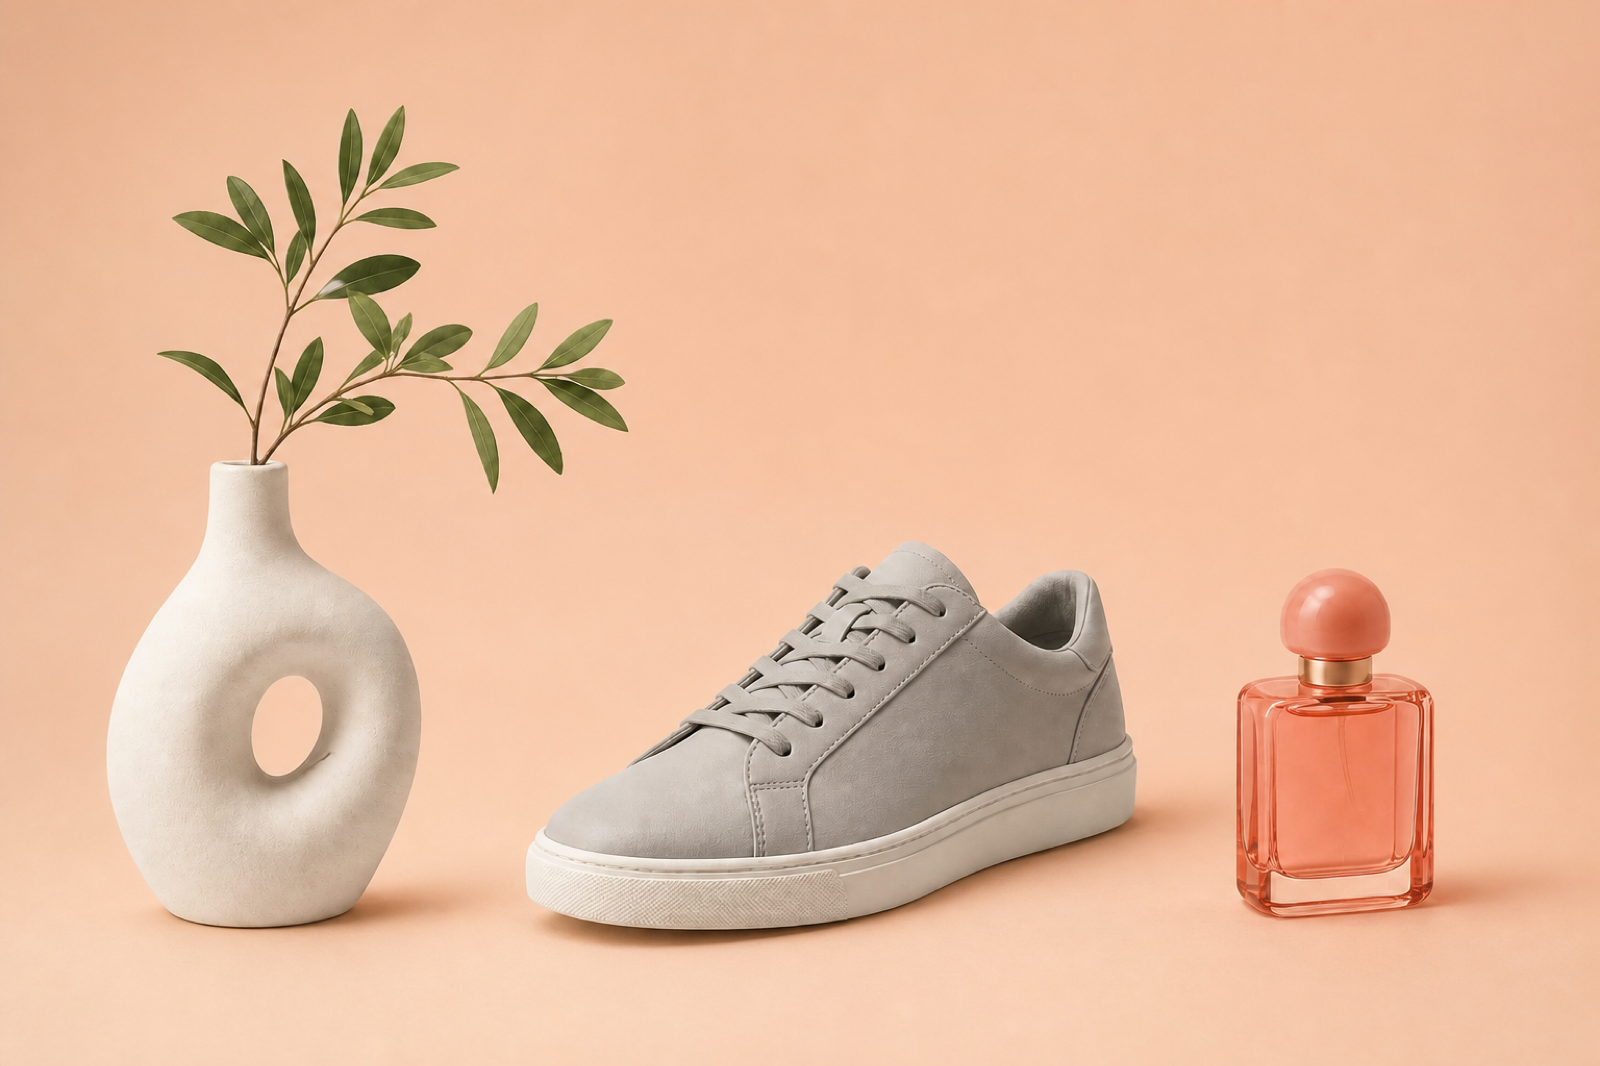
To remove a background from a picture, open it in Free BGRemover, choose your image, click Remove background, and check the cutout. Select Transparent, then download the PNG so you can place the subject in another picture, slide, or design.
Follow along with the sample photo, or use your own. In the example, the hole through the vase clears correctly, but the glass bottle keeps some of the peach background.
Want to erase just one object and keep the scene? That needs an object eraser; background removal cuts out the subject from its surroundings.
How to remove a background from a picture online
Before you start: use a JPG, PNG, or WebP file up to 15 MB and a browser and device with working WebGPU support. Some phones and older computers cannot run the tool. No account, payment, or app installation is required, and downloads have no added watermark.
1. Open your original picture
Open the Image Background Remover, click Upload an image, and select your picture. On a phone, tap the button and choose a file from your photo library or file picker.
Use the original photo when possible. Screenshots and copies saved from messaging apps may lose the fine details you need around hair or thin stems. Keep the original so you can compare results or retry from a fresh copy.
If your phone photo is HEIC, convert a copy to JPG or PNG first. Renaming the extension does not convert it.
2. Click Remove background
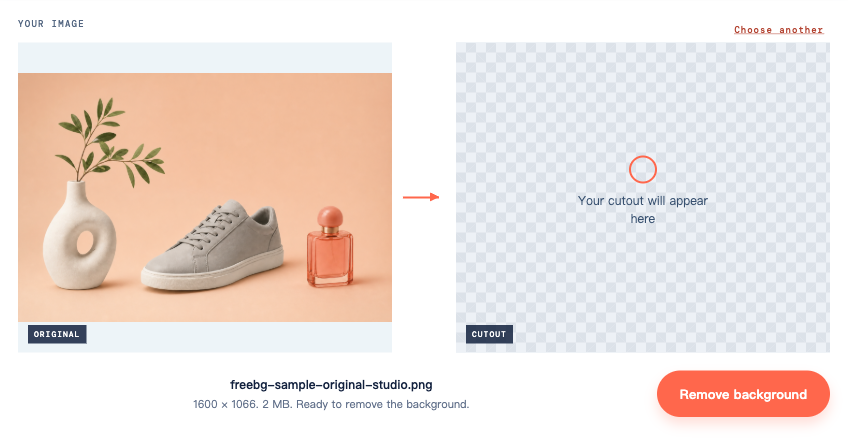
Click Remove background below the preview. Choosing a file alone does not start processing.
Keep the tab open while your browser downloads the model and processes the picture. The first run may take longer than later runs. If processing fails, see the browser and upload troubleshooting guide.
When processing finishes, the cutout appears beside the original. A checkerboard shows the transparent areas, and the Output background controls become available.
3. Check the subject and its edges
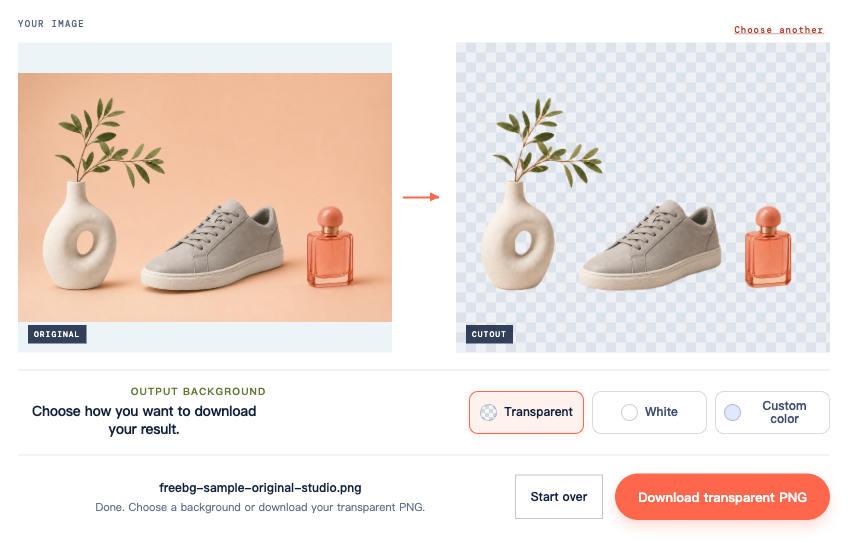
Compare the result with the original before saving it. Look for unwanted background as well as missing parts of the subject.
For a portrait, inspect hair, glasses, earrings, fingers, and shoulders. For a product, check handles, straps, thin supports, and holes through the object. In this example, pay attention to:
- The vase opening: the new background should show through it.
- The gaps between leaves: peach-colored patches would indicate leftover background.
- The perfume bottle: glass can retain colors from the original scene even when the surrounding background is gone.
Under Output background, choose White, then try a dark Custom color. A pale outline may disappear against white but become obvious against a dark surface. Dark remnants are easier to see on a light background.
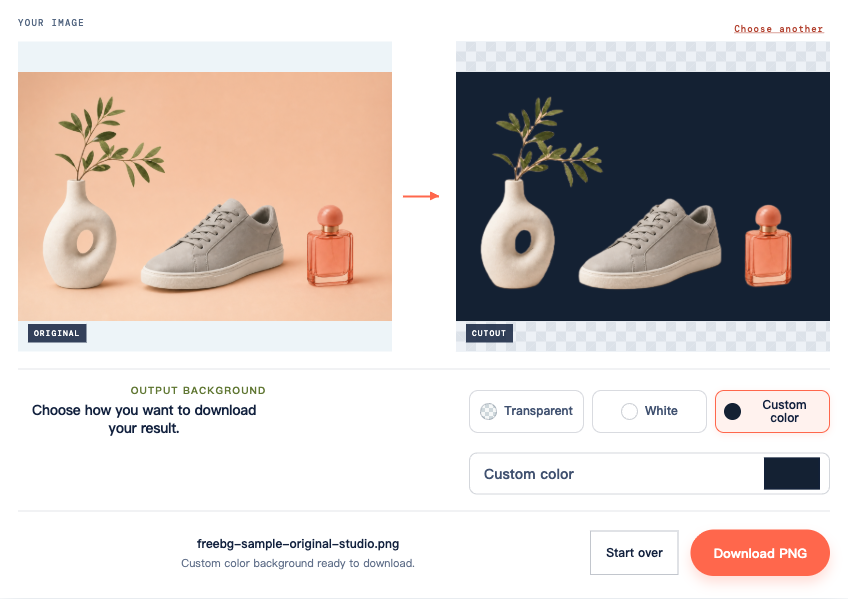
The close-ups below show two different outcomes from that same preview: a cleared opening and glass that still carries the old color.
4. Download a transparent PNG
After checking the edges, switch Output background back to Transparent. Click Download transparent PNG and save the file.
Leaving White or Custom color selected saves that color into the image. The PNG extension alone does not mean a picture has a transparent background.
Download the actual file rather than taking a screenshot. A screenshot captures the checkerboard as visible pixels and may give you a smaller image.
On a phone, check your browser’s downloads list or the Downloads folder in your file manager. The PNG may not appear automatically in your photo library. If it opens in a new view, use the browser’s save controls to keep the file.
5. Check the file where you will use it
Insert the PNG into the slide or design where you plan to use it. Change the background behind it.
The new color should show around the subject and through open gaps. If a white rectangle or checkerboard stays attached to the picture, those pixels are part of the file. Return to Free BGRemover, select Transparent, and download again.
A picture viewer may display genuine transparency against white or black. Check over another background before deciding that the download failed. Then inspect the subject at its final display size: are the hair, fingers, straps, and other details you need still there?
Check the pixel dimensions, too. The current tool normally scales pictures larger than 2,200 pixels on their longest side down to that size before export. A 4,000 × 3,000 photo can therefore download at 2,200 × 1,650. Smaller pictures are not enlarged by this step. Check the saved file’s dimensions before using it for a large layout or print.
What to do when the cutout looks wrong
Hair or fur looks cut off
Compare the missing strands with the original. If they are already blurred into the background, start with a sharper photo if you have one. If the subject occupies only a small part of the frame, try the cropped-copy workflow below. Free BGRemover has no restore brush, so a strand that remains missing cannot be painted back in this tool.
Part of the subject disappears
A pale sleeve, thin strap, or narrow stem may be mistaken for background. If other objects compete with your subject, crop them out of a copy and retry. Leave space around the subject’s entire outline. This may help the tool separate it, but cannot recover a part hidden behind another object or outside the frame.
A white or colored outline remains
Color from the old background can remain along the edge. Check it against the background and at the size you intend to use. If the fringe is still distracting, try another source photo if available. Repeating the same automatic removal may give the same result. Choosing a similar background can disguise a fringe, but does not remove it.
The downloaded picture looks blurry
Compare both files at the same display size. If the original is sharp but the download is smaller, the tool’s resizing may explain the difference. Check the saved dimensions against your layout’s requirements. If you need more pixels than the download contains, this export is unsuitable; stretching it will not restore the detail.
If the dimensions are adequate, check that you saved the PNG rather than a screenshot and are not stretching it beyond its size. Softness limited to the outline is an edge-quality issue; increasing the export dimensions will not repair it.
Glass or transparent objects look wrong
The bottle in the close-up retains peach-colored areas because glass contains reflections and colors from the scene behind it. Removing the outside background does not reconstruct what should show through the bottle.
For a casual design, a similar background may make the color less noticeable. For an accurate product photo, use a photograph taken against the intended background if possible. The current tool cannot remove the peach tint inside this bottle independently of the glass.
What to try when you only have one photo
If your subject is small in the frame or surrounded by unrelated objects, try a tighter crop:
- Make a copy of the original photo, not the downloaded cutout.
- Crop away unrelated objects and excess space. Keep the full subject, including hair, fingers, handles, and stems, with a little room around the outline.
- Upload the cropped copy to Free BGRemover and click Remove background.
- Compare the problem area in both results. Use the new version only if it retains the details you need and has enough pixels for your design.
Cropping changes what the tool sees; it does not guarantee a better result. If the same essential detail is still missing, keep the original instead of using an incomplete cutout. There is no erase or restore control in the current tool to correct it further.
Choose the background for your finished picture
| Your next step | Choose in Free BGRemover | Check before using it |
|---|---|---|
| Place a person in a presentation | Transparent | The slide shows through around the subject |
| Add a product to a promotional design | Transparent | Edges look clean against the new layout |
| Create a finished white-background picture | White | Crop and dimensions suit the destination |
| Put a subject on a brand color | Custom color | The selected color matches your design |
All three options download as PNG. If you need a white-background image, the white background tool provides a dedicated starting point.
Keep a transparent PNG if you plan to reuse the subject on different backgrounds. JPG cannot store transparency; converting an ordinary JPG to PNG does not remove its background. The PNG transparency guide explains this distinction with examples.
Frequently asked questions
Can I use this on my phone?
Yes, if its browser and hardware support the required WebGPU features. Uploading successfully does not guarantee that processing will run. If it fails repeatedly, try a compatible computer. On a small screen, scroll below the preview to reach the download controls.
Can I remove a background without sending my photo to a server?
Free BGRemover’s current removal workflow processes the picture in your browser. The file-selection button is labeled upload, but the photo is not sent to a remote service for background removal. Your browser still needs a connection to load the site and model. See the Privacy Policy for information about the site’s data handling.