
Open Black Background Remover, upload your image, and click Remove background. Check the result, choose Transparent, and download the PNG. If your picture includes black hair, clothing, or lettering, check those areas before saving: removing the backdrop should not remove them too.
The common mistake is to erase black everywhere. That can work for a white icon on black, but it can punch holes through a dark product or make a person’s hair disappear. Start with the method that fits your image.
Choose the right method for your image
| What you have | What to use | What to watch for |
|---|---|---|
| A person, pet, or product on black | Black Background Remover | Missing hair, fur, straps, or dark edges |
| A simple graphic with no black details to keep | Remove Color from Image | Thin lines and letters disappearing |
| A logo with black lettering or outlines | The original transparent file, if available | Color removal can erase the logo along with the background |
| A PNG that looks black only when opened | Check whether it is already transparent | The viewer’s background may be black |
For a photograph, start with the background remover. For a flat graphic, inspect the artwork before choosing color removal. If black is part of the design, it needs to stay.
How to make a black background transparent
1. Upload your original image
Open the black background tool and click Upload Your Image. Choose a JPG, PNG, or WebP up to 15 MB.
Use the original photo or image download when you have it. A screenshot may be smaller, include extra borders, or already have a solid background added. Keep your source file so you can compare the result with it.
2. Remove the background
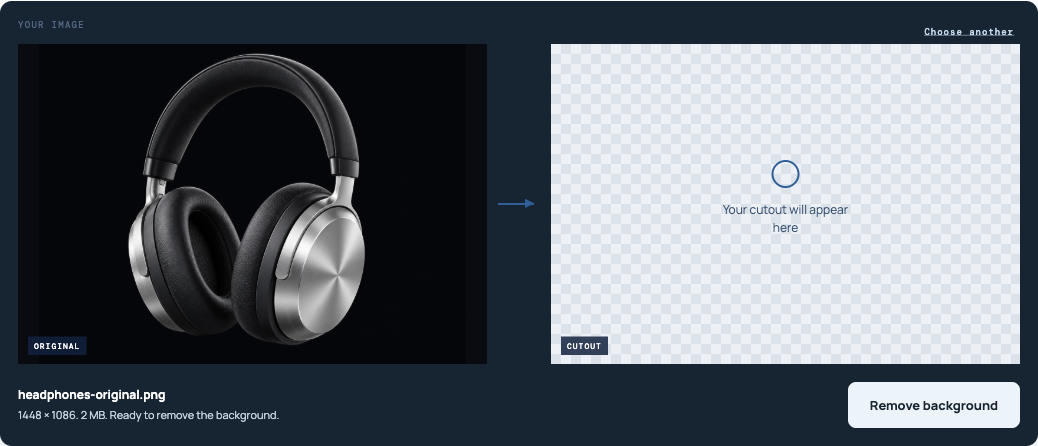
Click Remove background and wait for the result beside the original. The checkerboard shows the areas that are now transparent.
Look at the subject first. Is the whole outline still there? Are the ears, shoulder straps, thin stems, or lettering intact? A large transparent area does not mean the cutout is ready to use.
3. Look at the result on white
Choose White beneath the preview. This makes leftover dark edges and holes easier to spot than a checkerboard alone. Compare the same parts of the original and result.
If the cutout is going into a colored design, try Custom color too. A dark edge that blends into one background can stand out on another.

4. Switch back to Transparent and download
Choose Transparent, then click Download transparent PNG. The White and Custom color options change the file you download, so switch back before saving a cutout with no solid background.
Save the downloaded file, not a screenshot of the preview. A screenshot includes the checkerboard or page color as ordinary image pixels. The screenshots in this article illustrate the controls; they are not transparent cutouts to download.
How to remove a black background without losing dark details
Keep black parts of the subject opaque
Dark clothes should still look solid after removal. You should not see the new background through a jacket, product panel, or letter that was opaque in the original.
Use the background remover for these images. The color remover works differently: it removes matching colors throughout the picture, including colors inside the subject. Reducing its tolerance may separate nearby shades, but it cannot protect one black area while removing another identical black area.
Check three places before downloading:
- The outside edge: look for missing hair, fur, corners, and thin straps.
- The solid areas: check that dark clothing or product surfaces have not become see-through.
- The openings: look inside handles and between limbs or straps. Those spaces should reveal the new background when they belonged to the backdrop.
If an important detail disappears
Compare it with the original. If the detail is clear there but missing in the result, the automatic removal has made a mistake. Do not keep the damaged version simply because the background is gone.
If you used color removal, return to the original and try the background remover instead. If the background remover also misses the detail, try a clearer source image. Re-uploading the same file does not give you control over the missing area.
The current tool has no restore brush or manual edge control. It cannot let you paint a missing detail back in. If you need an exact outline and the automatic result fails, keep the original and use a different source or a manual retouching workflow.
Start with an edge you can see
When black hair or fabric merges completely into the backdrop, there may be little visible boundary to work with. Brightening the finished cutout will not bring back a part that was removed.
For a new photo, add enough light to separate the subject’s edge from the background. For an existing design, look for a larger image or the original transparent export. These are more useful starting points than a small, flattened copy.
Remove a plain black background from a graphic
For a white icon or colored artwork with no black details to preserve, Remove Color from Image offers a more direct approach.
- Upload the graphic and click a flat part of the black background. Avoid the edge of the artwork, where colors can mix.
- Under Replace with, choose Transparency.
- Start with a low Tolerance and click Remove selected color.
- If dark background patches remain, raise the tolerance a little and apply removal again.
- Use Compare original to check thin lines and text, then click Download PNG.
Changes to tolerance do not update an existing result until you apply removal again. Each run uses the uploaded original, so lowering the setting can restore details removed by a previous, broader color match.
Stop increasing tolerance when letters start thinning or the subject develops holes. The tool has no local selection or protection brush; a wider color range will not know which dark pixels you intended to keep.
For smoke, sparks, or a glow, a hard color removal can also erase soft transitions. If those details matter, start with a transparent version of the effect when one is available. This workflow cannot promise a clean result for every translucent image.
What to do about black edges and missing pieces
A cutout can look fine on a dark canvas and have a visible rim on white. Before trying to remove that rim, compare it with the original: a black outline, seam, or shadow on the object may belong there.
| What you see | What to do next |
|---|---|
| Small black background patches after color removal | Increase tolerance slightly and apply again. Stop if the artwork starts disappearing. |
| Holes in black hair, clothing, or text | Return to the original. Use subject-based removal if you were removing a color. |
| A thin black halo around an otherwise intact subject | Check it on the intended background. The current tool has no dedicated edge-cleanup control. |
| Black left inside a handle or between straps | Treat it as a missed background area. Do not mistake a complete outside outline for a finished cutout. |
| A black box around the entire downloaded image | Check the downloaded file’s transparency and the export choice. |
Inspect the image at the size you plan to use it, as well as enlarged. A rough pixel you only notice at extreme zoom may not matter in a small graphic; a missing letter or broken strap still does.
Check that your downloaded PNG is transparent
A PNG can hold transparent pixels, but it can also contain a solid black background. Changing the file extension or converting a JPG to PNG does not remove the background.
Place the downloaded PNG over white, then over another color in your design. The new color should show through outside the subject and through genuine openings. The solid parts of the subject should stay solid.
If a black rectangle moves with the image, it is probably part of the file. Return to the tool, choose Transparent, and download again. If the file blends correctly into your design but looks black in a viewer, the viewer may simply be displaying a black canvas behind it.
Keep PNG as the format when you need transparency. Saving the result as JPG fills the transparent areas with a solid background. For more checks, see Why Is My PNG Not Transparent?.
Frequently asked questions
Can I remove a black background from a JPG?
Yes. Upload the JPG, remove its background, and download the result as PNG. You can use a JPG as the source; the finished transparent image needs a format that supports transparency.
How do I remove the black background without erasing black text?
Avoid removing black everywhere. If the text and backdrop share the same black, color matching will select both. Start with the original transparent logo or a source where the artwork and background are separate. Do not use a result with broken or missing letters.
Will changing the background to white make it transparent?
No. White adds a solid white background to the download. Choose Transparent if you want to place the subject over other colors or images later.
Can the tool fix every dark edge automatically?
No. Fine hair, dark-on-dark boundaries, and translucent effects can need more work than automatic removal provides. Check the result before using it, especially where the subject nearly disappears into the original backdrop.
Remove your image’s black background, inspect the dark details on white, and switch back to Transparent before downloading.